Programming
This resource helps Digital Technologies teachers make sure their teaching of programming
is aligned with the Australian Curriculum from Foundation to Year 10.
What you'll find
- A clear explanation of the relationship between programming and algorithm design
- Ideas supporting progressive development of visual programming to general-purpose programming
- Practical classroom activities
- Resources to help in planning and assessment
Programming focus by year band
| Year band | Students learn to |
|---|---|
| Foundation | Not included at this level in Digital Technologies |
| 1 - 2 | Not included at this level in Digital Technologies |
| 3 - 4 | Make visual programs that can take an input, repeat things and make decisions while running |
| 5 - 6 | Use variables to remember data within their visual programs |
| 7 - 8 | Make programs in a language like Python, and organise their code with functions |
| 9 - 10 | Structure data and functionality in more organised and complex ways in their programs |
What is programming?
Programming (also called coding) is making sets of instructions that will run on a computer or other digital device.
While an algorithm design represents instructions in a form that humans can understand, the design must be implemented in a computer language to be a working program.
A simpler explanation can help …
Programming is using a computer language to make a working program than runs as expected.
Why is it relevant?
Without programming, algorithms remain abstract. To make a working app, website or robot, students have to implement the instructions that make up an algorithm in a real computer language.
Once an algorithm is programmed, students can get immediate feedback on how effective it is by running it on their device. They can observe what happens, test different inputs and improve their code.
Key terms in the curriculum
| Implement | Take an algorithm design and make it into a working program on a computer or other digital device. |
|---|---|
| Visual programming (years 3–6) | Programming by dragging together coloured code blocks. Popular ‘languages’ include Scratch and MakeCode. |
| General- purpose programming (years 7–10) | Programming by typing lines of code in a language used across multiple domains. Popular languages in schools are Python and JavaScript. |
| Control structures | Specific pieces of code in a program that allow for decisions, repetition and other kinds of flow that algorithm designs require. |
| Variable | A name that refers to a piece of data in a program. For example, a variable called ‘age’ might store a user’s current age in years. |
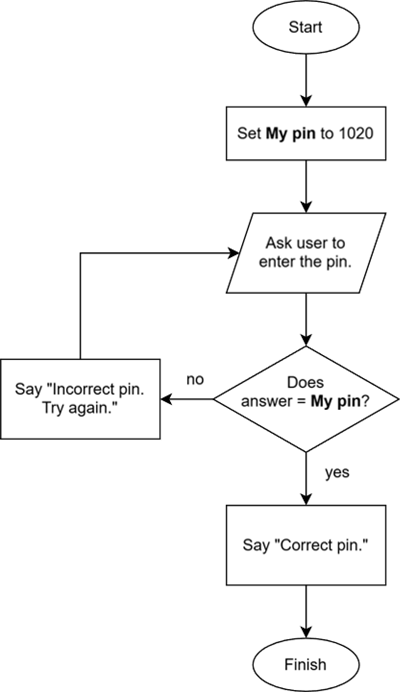
The class has been developing an algorithm for a simple PIN security system. They have sketched this flowchart. ‘My pin’ is a variable that holds the value 1020. |
|
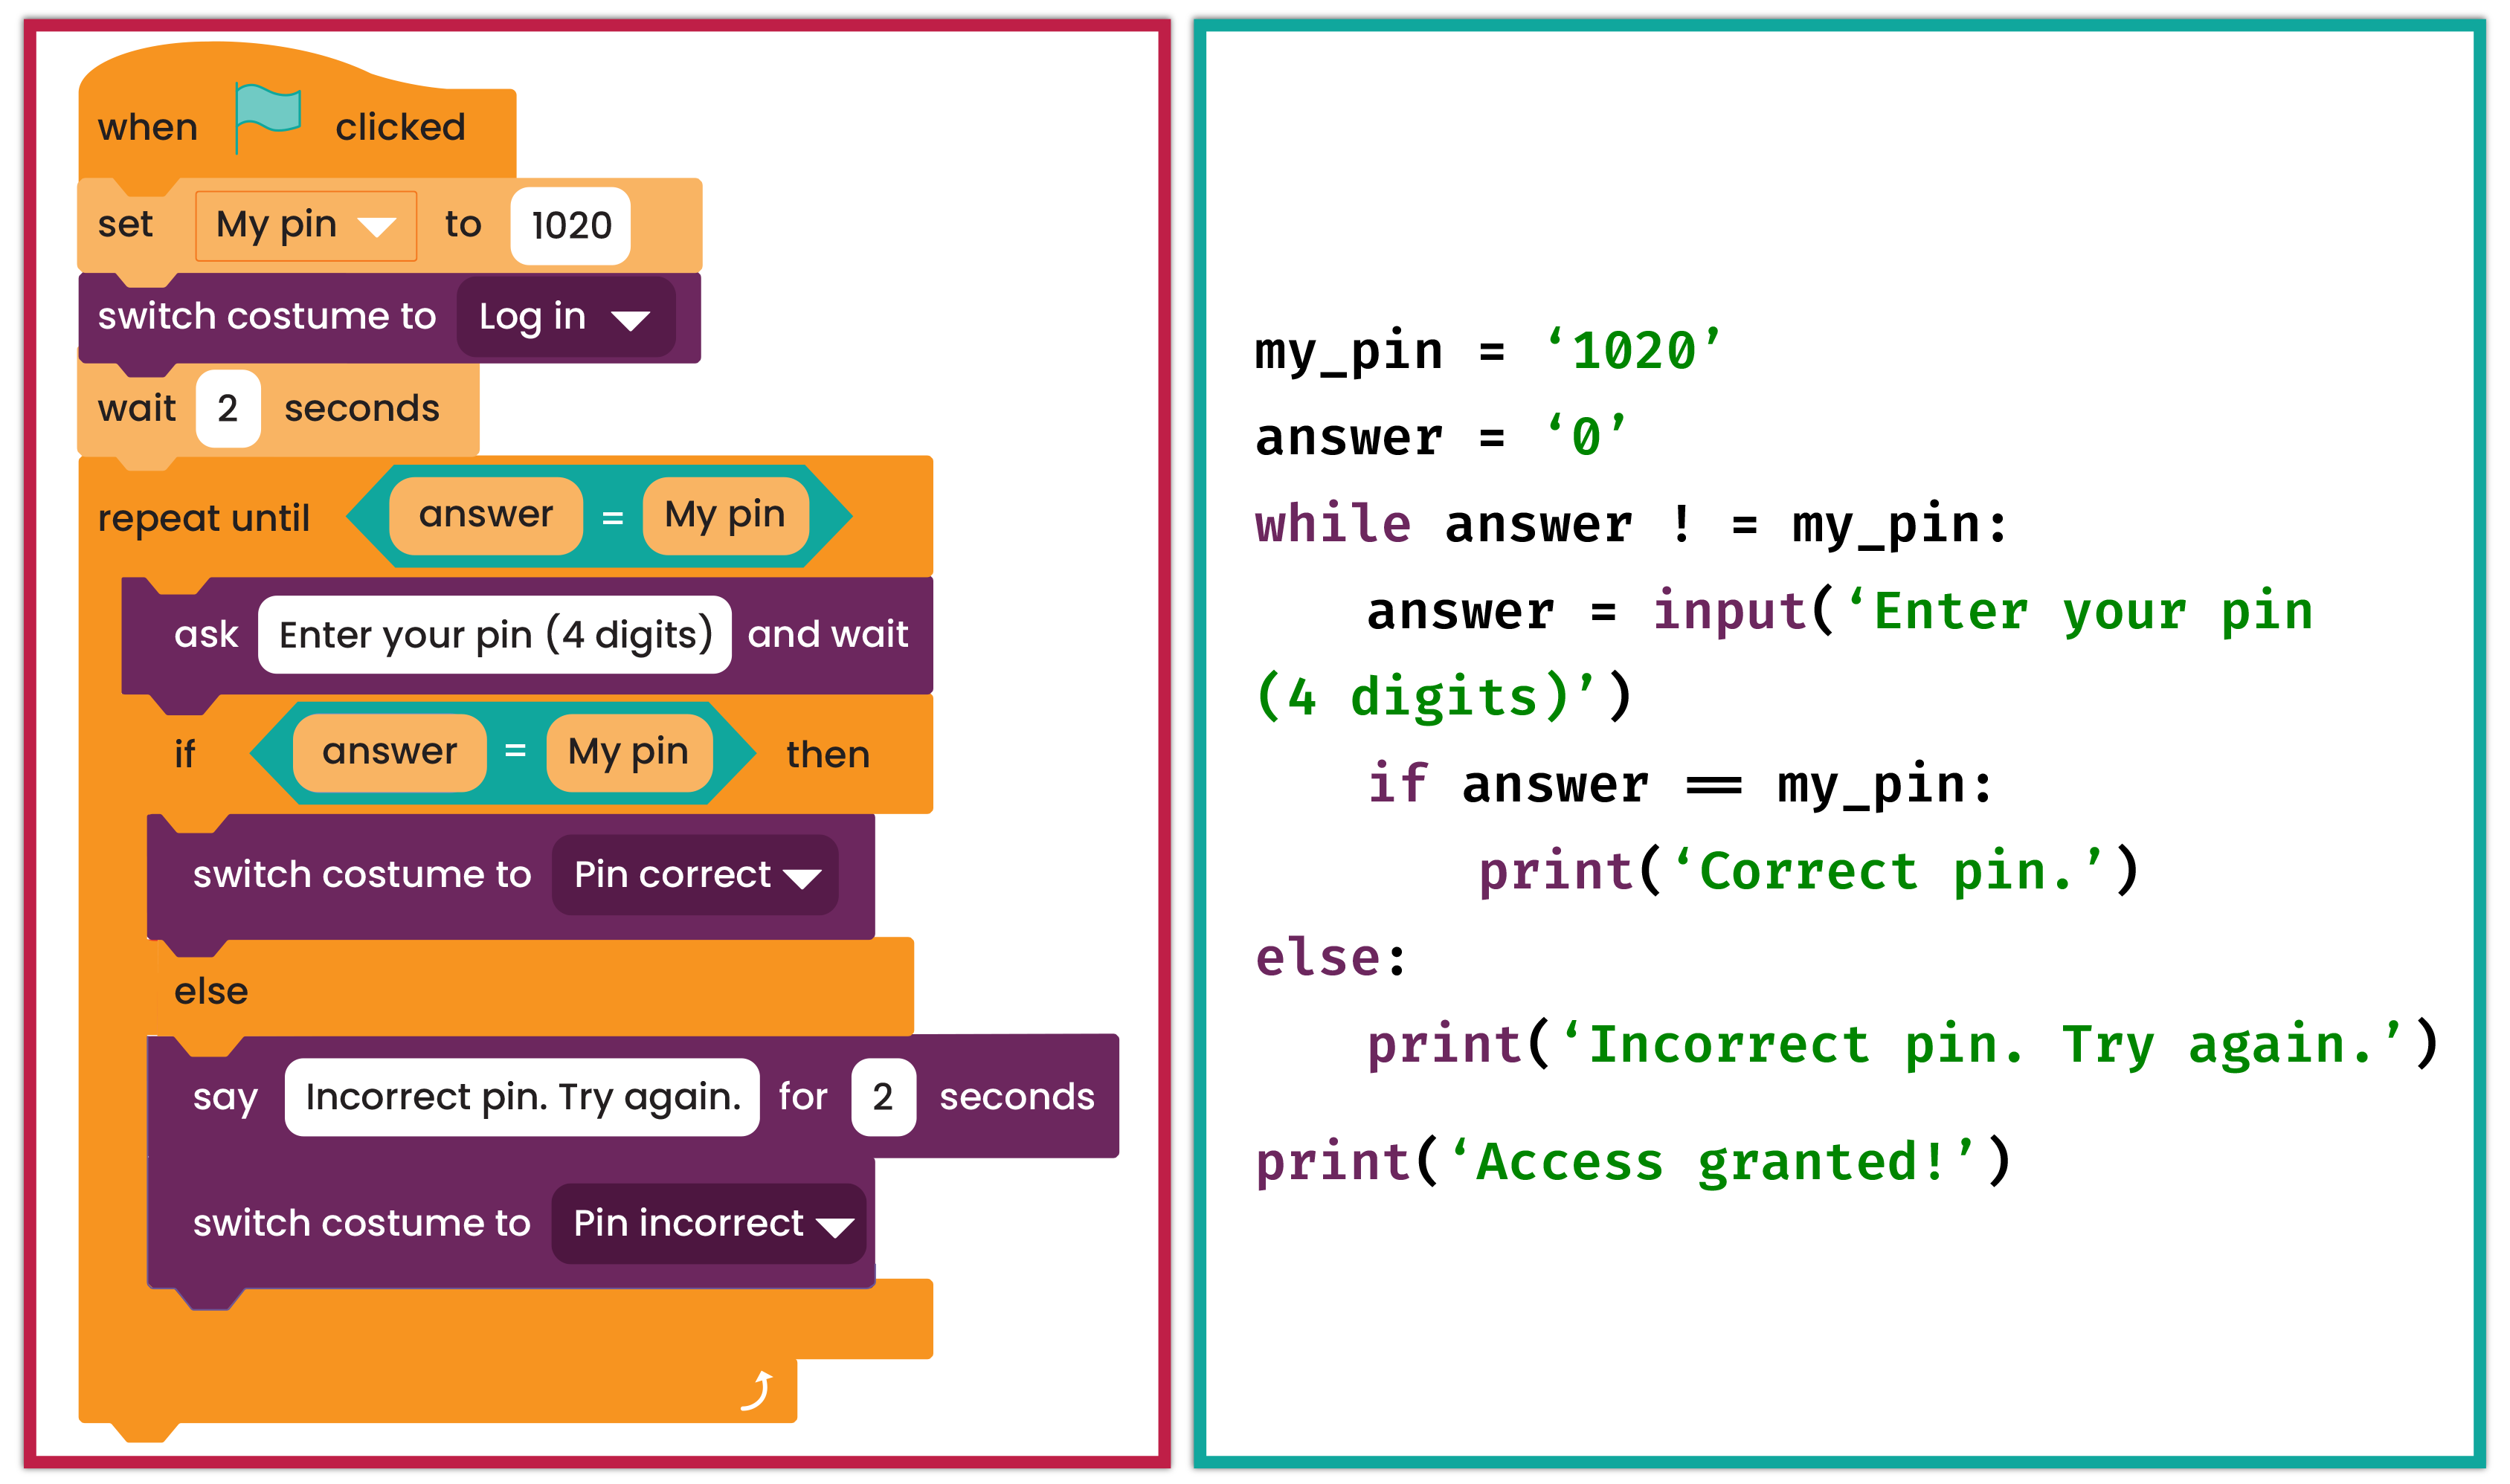
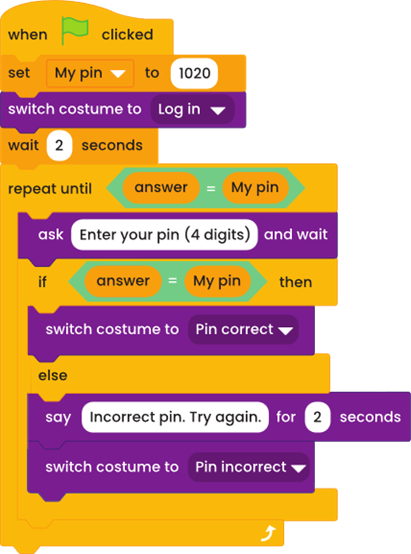
In years 3–6, students make a visual program that enables the algorithm to run on a computer or tablet. Control structures include the yellow ‘REPEAT until’ block, as well as the ‘IF-ELSE’ block. |
|
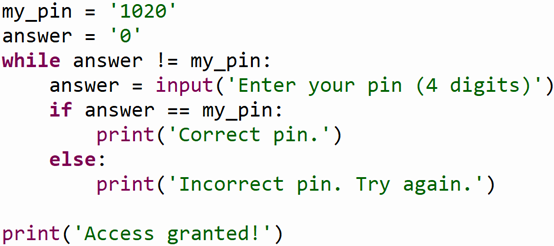
In years 7–10, students type a Python program that implements the same algorithm. Control structures include the WHILE and IF structures. |
|
Programming languages
Thousands of programming languages and environments exist, but only a few are popular in schools.
| Scratch (years 3–6) | A visual programming environment that features a stage onto which students add ‘sprites’ – objects or characters. Programs are made by dragging and dropping code blocks into a sprite’s script. We recommend using the Scratch Desktop offline app with students. The offline version avoids all online community and social features, providing a safer, distraction‑free environment for classrooms. It also works without an internet connection and works more smoothly on school devices. |
|---|---|
| MakeCode (years 3–10) | Another visual programming environment where students drag and drop code blocks to make programs. Programs can be sent to electronic devices such as the micro:bit and MakeCode Arcade. Also used for Minecraft Education. Supports both visual blocks and general-purpose languages Python and TypeScript. |
| Python (years 7–10) | A general-purpose programming language that emphasises clarity and minimises extra words and characters (syntax) common in other languages. Python can be written and tested on some websites, as well as in offline environments such as the simple Thonny and the powerful VS Code. |
| JavaScript (years 7–10) | Another general-purpose programming language, very common due to its use in making webpages interactive. |
Generative AI (GenAI)
Use of GenAI tools such as Copilot and ChatGPT can assist students in learning programming by generating code, explanations and feedback. While this can enhance access and support differentiation, it also raises considerations around student agency, reliance on generated solutions and academic integrity. Thoughtful integration can help ensure these tools support, rather than replace, student learning.
Connections to computational thinking
Computational thinking helps people organise data logically by breaking problems into parts, defining abstract ideas, and designing algorithms, patterns and models. Programming then uses a coding language to turn these algorithms into executable instructions that a computer can follow.
Refer to ACARA’s Computational thinking poster. (opens external website in a new window)
What to teach?
While algorithms are introduced from Year 1, programming does not need to be explicitly taught until Year 3.
Here’s how the skills develop across year bands:
Programming in years 1–2
Not part of this year level band.
This concept does not appear in the Australian Curriculum: Digital Technologies in years 1–2.
However, students can benefit from pairing some simple programming with the algorithm concepts being learned.
A precursor to using a formal programming language is to use a programmable floor robot with push buttons to code a sequence of movements, such as Bee-Bot.
The focus is on physically programming and then observing what happens when the instructions are run.
What this looks like in practice
Students push buttons to ‘key in’ a sequence on a floor robot to:
- command the robot; for example, to move square-by-square
- follow a written or drawn algorithm; for example, a sequence of moves and turns to guide the robot from one square to another.
They can also:
- observe the robot’s movements and adjust the sequence to fix or complete a route
- write and test their own sequence.
Programming in Years 3 - 4
Expectation for this band
Students can:
- make working programs in a visual programming environment
- convert an algorithm design (written steps) into a working visual program
- use a decision control structure (if-then) to make decisions in their program
- use a repeat control structure (forever or repeat) to make parts of their program loop
- include input in their program, such as responding to a button push, or asking the user to answer a question.
In years 3–4, the focus is on familiarising students with a visual programming environment, then using that visual language to make a program from a written algorithm (written steps).
What this looks like in practice
Students use an environment like Scratch to:
- learn the basic coding blocks with foundational tasks
- code a simple chatbot that makes decisions to respond to words typed in
- make a game that allows the player to control a character with key presses.
Students are not working from a ‘blank slate’ every time they code. The teacher also provides a mix of code pieces that are completed, half-completed or faulty.
By the end of this lesson students will be able to design and algorithm for a chatbot and implement it using a visual program.
Retrieval: If a computer could have a conversation, what instructions would it need to know what to say next?
Computers do not understand conversations the way people do. They respond by following algorithms that tell them what to do when they receive different inputs. By creating a chatbot, we can explore how instructions can be used to simulate a conversation.
Explain that we will learn to code a simple conversation using questions, answers and decision-making.
Step 1: Start with an algorithm.
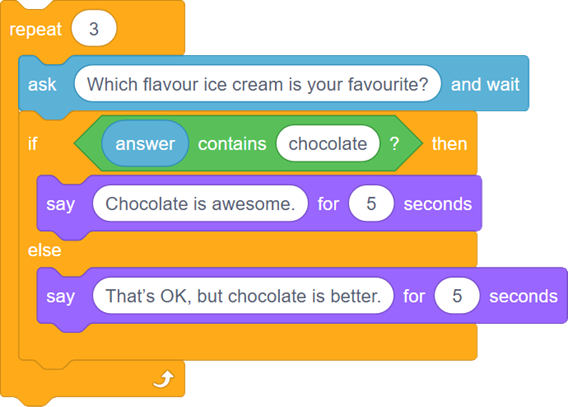
The class settles on a simple algorithm for their chatbot’s first question and response. The algorithm can be developed as written text on the board. This example makes use of two blocks (ask and answer) that are useful for early programming.
For example:
- Ask ‘Which flavour ice cream is your favourite?’
- If the answer contains ‘chocolate’
-
- Say ‘Chocolate is awesome.’
- Otherwise
- Say ‘That’s OK, but chocolate is better.’
-
- (Optionally) Ask the same question another two times.
Step 2: Write and run code.
Students code the algorithm in a visual coding environment like Scratch. This can be done explicitly, with the whole class, or students can be given time to do it themselves.
Step 3: Build on it.
Have students continue the conversation with other questions and responses.
Note: Activities in this lesson are designed to develop foundational programming skills. Although students may associate chatbots with generative AI, the chatbot developed in this activity is a rule-based program that responds according to predefined algorithms rather than generating new content.
Evidence of learning
You might notice that students:
- choose the correct code blocks for input, such as the ASK block and ANSWER block
- use the control structure for decisions correctly, such as the IF-ELSE block
- use the control structure for repeating correctly, such as the REPEAT block
- debug faulty code – find where it is going wrong by looking carefully at, stepping through and running it.
Common misconceptions or errors to watch for
- Using the wrong control structure blocks
- Placing a code block inside a control structure when it should be outside, or vice versa
- Making many small response programs for each input, instead of one long program as in the example.
When a student’s code does not run as expected, encourage them to talk through their code with a class member step-by-step before seeing the teacher.
Poster: Key ideas, practical examples, Australian Curriculum
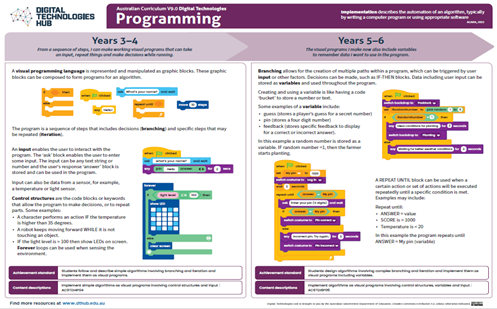
Download Programming poster (years 3-4) [PDF] (opens in a new window)
Programming in Years 5 - 6
Expectation for this band
Students can:
- make working programs in a visual programming environment
- convert a formal algorithm design (flowchart or structured text) into a working visual program
- use and explain control structures (IF-THEN-ELSE) to create multiple branches from a decision
- define and use variables as required in their programs.
In years 5–6, the focus expands from foundational visual programming skills developed in years 3-4, to include variables and more advanced use of control structures, allowing more sophisticated program flow.
What this looks like in practice
Students use an environment like Scratch to start, complete or modify projects:
- where bits of data are remembered, such as a running score in a game
- where one decision leads to multiple possible outcomes, such as a player’s age determining one of four difficulty levels in a quiz.
Students are not working from a ‘blank slate’ every time they code. The teacher also provides a mix of code pieces that are completed, half-completed or faulty.

By the end of this lesson students will be able to create a visual program that responds to a condition by changing the stage backdrop.
Retrieval: When playing an online game, what might happen if your character runs out of lives or health? How does the game let you know?
Games often react to what is happening during play. Programmers use conditions to make events happen when certain requirements are met. In this lesson, we will create a game that changes its backdrop when the player's health changes.
Goal: Add code to a game that will change the stage backdrop depending on the player’s health score.
Rather than design an entire algorithm without coding, the class will build up code a little at a time, with the teacher adding ‘bugs’ to solve.
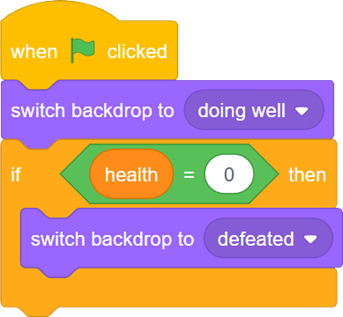

Students may notice that the above code is not working as expected. The doing well backdrop appears at the start, but the backdrop does not change to defeated when the player reaches zero health.
Why?
The computer only checks the health value once, right when the game starts.
What is needed to make the computer keep coming back to check?
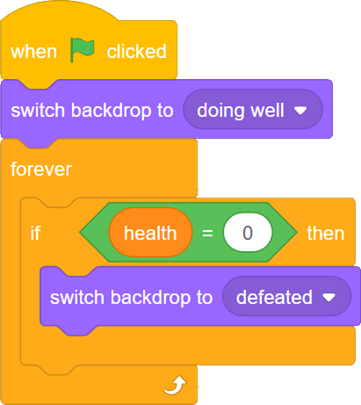
What’s needed is a loop.
Now the health value is continually monitored.
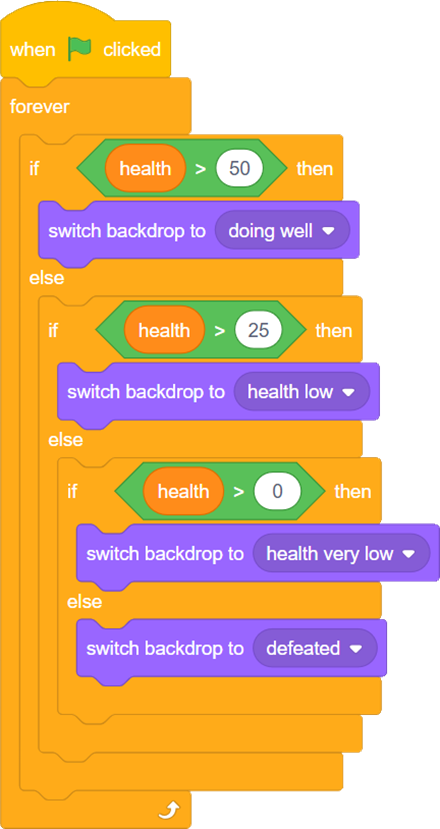
We want four different backdrops:
- doing well backdrop when health is above 50
- health low backdrop when health is between 25 and 50
- health very low backdrop when health is between 0 and 25
- defeated backdrop when health is 0.
The expanded code is also not working as expected. The backdrop changes continuously, or gets stuck on health very low, even when health is 25 or more.
Why?
Step through the logic carefully. The IF-THEN blocks are all running as separate checks after each other. This means as long as health is greater than 0, the health very low backdrop overrides the previous settings.
What is needed to make the checks more sophisticated?
A different arrangement of control structures is needed, with the use of IF-THEN-ELSE structures.
Discuss how this logic is different, and why it works.
Evidence of learning
You might notice that students:
- use loop control structures like FOREVER or REPEAT appropriately to achieve the desired behaviour
- use IF-THEN-ELSE control structures appropriately to select from multiple outcomes to a decision
- decide when and how to introduce and use variables to remember pieces of data when a program is running
- debug faulty code – find where it is going wrong by looking carefully at, stepping through and running it.
Common misconceptions or errors to watch for
- Using the wrong control structure blocks
- Placing control structure blocks in the wrong order, or not nesting them correctly
- Neglecting to set variables to an initial value; for example, setting health to 100 when a game starts
- Making many small response programs instead of one long program as in the example.
When a student’s code does not run as expected, encourage them to talk through their code step-by-step with a class member before seeing the teacher.
Poster: Key ideas, practical examples, Australian Curriculum
Download Programming poster (years 5-6) [PDF] (opens in a new window)
Programming in years 7–8
Expectation for this band
Students can:
- make working programs in a general-purpose programming language like Python
- convert a formal algorithm design (flowchart or pseudocode) into a working program
- use and explain control structures (for loops and decisions) and variables as appropriate
- use functions to better organise their code
- debug their code, using available tools and strategies.
In years 7–8, the focus shifts from coding in a visual environment, as students do in years 5–6, to coding with a general-purpose programming language, expanding their coding capabilities.
Key terms in the curriculum
| Function | A section of code that is named and is separated from the main program. |
|---|---|
| Debug | To find and fix pieces of code that cause the program to behave in unexpected ways. |
What this looks like in practice
Students use a programming language like Python to start, complete or modify code for:
- an application that performs a repeated calculation using different decisions based on the input data
- a game that involves repetition of a certain behaviour, but with variations
- a machine or robot that moves and waits autonomously to keep performing a task.
As they code, students use tools like breakpoints and code stepping to debug their programs.
Students are not working from a ‘blank slate’ every time they code. The teacher also provides a mix of code pieces that are completed, half-completed or faulty.
By the end of this lesson students will be able to create a function that draws a regular polygon with a specified number of sides.
Retrieval: What instructions would you give a computer to draw a shape such as a square or triangle?
Computers draw shapes by following a sequence of instructions. By identifying patterns in these instructions, we can create algorithms that draw many different shapes instead of just one.
Students explore polygons and as a class record their observations in a table:
| Number of sides | Shape | Turn angle |
|---|---|---|
| 3 | Triangle | 120° |
| 4 | Square | 90° |
| 5 | Pentagon | 72° |
| 6 | Hexagon | 60° |
Ask:
- What happens to the turn angle as the number of sides increases?
What relationship is there between the number of sides and the turn angle? How can we write an algorithm that works for any regular polygon?
Goal: Starting with a simple square, gradually code a function that can draw any polygon with a specified number of sides.
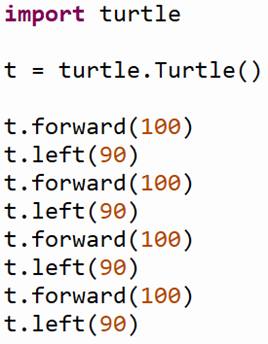
Test at each step. First, we get a result like this:

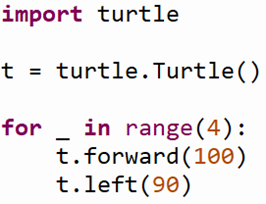
There should no change to the drawn shape.
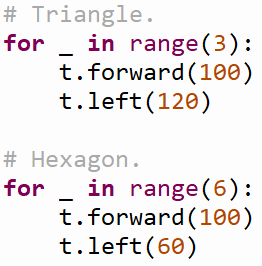
Note how the left turn angle must be adjusted to make a complete polygon each time.
How can we make it work for any number of sides? What’s the pattern?
Here’s a working algorithm in pseudocode:
REPEAT no_of_sides TIMES
MOVE FORWARD 100
TURN LEFT (360 ÷ no_of_sides)
END REPEAT
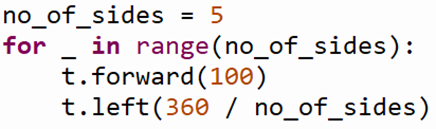
With no_of_sides set to 5, we should get a pentagon.
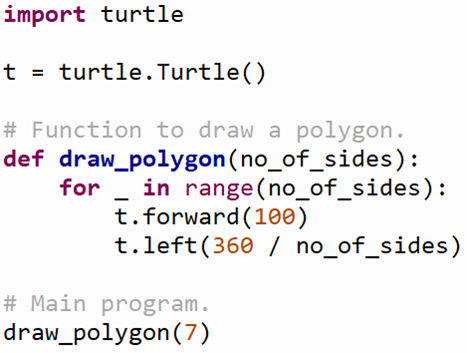
Discuss, why is this a better way to organise code?
Consider that we can now call draw_polygon at any time, for any number of sides we want.
Through this activity, students recognise that programmers can generalise solutions by identifying patterns, using variables and parameters, and organising code into reusable functions.
Evidence of learning
You might notice that students:
- add loop control structures like FOR and WHILE appropriately
- add IF and IF-ELSE control structures appropriately, including as part of nested arrangements with other IF-ELSE structures and loop structures
- decide when to define and call functions, to better organise their code
- use tools in their coding environments to debug faulty code. These tools include breakpoints and stepping through code.
Common misconceptions or errors to watch for
- Using the wrong control structure blocks
- Placing control structure blocks in the wrong order, or not nesting them correctly
- Misunderstanding the concept of functions; for example, thinking that since they appear in the code, they should run without being called
- Neglecting to set variables to an initial value.
When a student’s code does not run as expected, encourage them to talk through their code step-by-step with a class member as part of their debugging process.
Poster: Key ideas, practical examples, Australian Curriculum
Download Programming poster (years 7-8) [PDF] (opens in a new window)
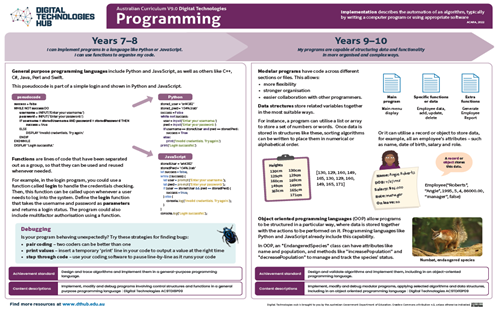
Programming in years 9-10
Expectation for this band
Students can:
- make working programs in a language like Python, which is both a general-purpose programming language and an object-oriented programming language
- work with modular programs; for example, an application with code organised across multiple files
- convert common algorithms – for example, Binary Search and Selection Sort – from designs into working programs
- use and explain data structures such as lists and dictionaries (also called associative arrays)
- use and explain basic object-oriented principles to organise their code; for example, writing simple classes
- debug their code, using available tools and strategies.
In years 9–10, the focus shifts from the foundations of general-purpose programming covered in years 7–8, to more advanced techniques for storing and processing data in code.
Key terms in the curriculum
| Modular | Programming projects where different parts of the code may be in different files. |
|---|---|
| Data structure | A list or dictionary (associative array) where multiple values are stored under one reference name. In contrast, a simple variable can store only one value. |
| Object-oriented programming | A way of organising code that groups both data and functionality together in arrangements known as classes. |
What this looks like in practice
Students use a language like Python to start, complete or modify code for:
- an application that reads in, stores and sorts data from a text file
- an application or game that uses libraries or functions stored in separate code files
- an application that includes a graphical user interface
- an application incorporating object-oriented principles, where key data is stored and accessed using a class.
As they code, students use tools like breakpoints and code stepping to debug their programs.
Students are not working from a ‘blank slate’ every time they code. The teacher also provides a mix of code pieces that are completed, half-completed or faulty.
By the end of this lesson students will be able to use code to analyse a large dataset.
Retrieval: How can you analyse a large dataset in a spreadsheet? What challenges might arise when the dataset becomes very large?
Spreadsheets are useful for many data-analysis tasks, but some forms of analysis become difficult when datasets are very large or unstructured. Programming allows us to automate complex processing and analyse data at a much larger scale.
Goal: Gradually code an application to read in text for an entire (out of copyright) book, then find the most frequent words.
This is an example of data analysis that is difficult in a spreadsheet, but easier with code.
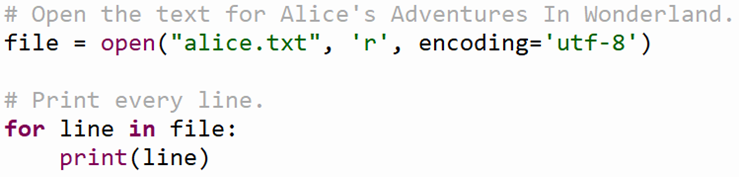
Already, we are using a simple loop to print every line in the file.
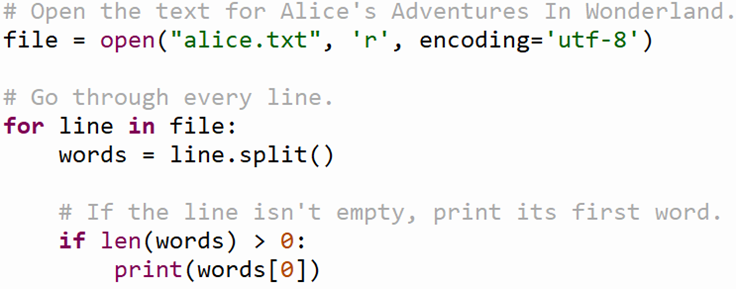
‘words’ is a list data structure containing the words in the current line.
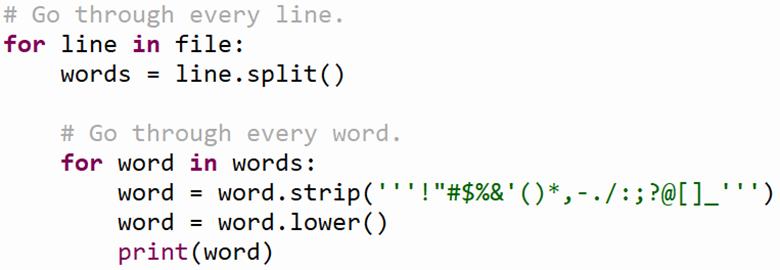
We are attempting to strip all special characters that are attached to each word. We also convert each word to lower case.
Discuss: Why is cleaning the words necessary?
Students should recognise that:
- ‘Dog’, ‘dog’ and ‘DOG’ should usually be counted as the same word.
- Punctuation attached to words creates duplicates.
- Raw data often contains inconsistencies.
- Data cleaning improves the quality of analysis.
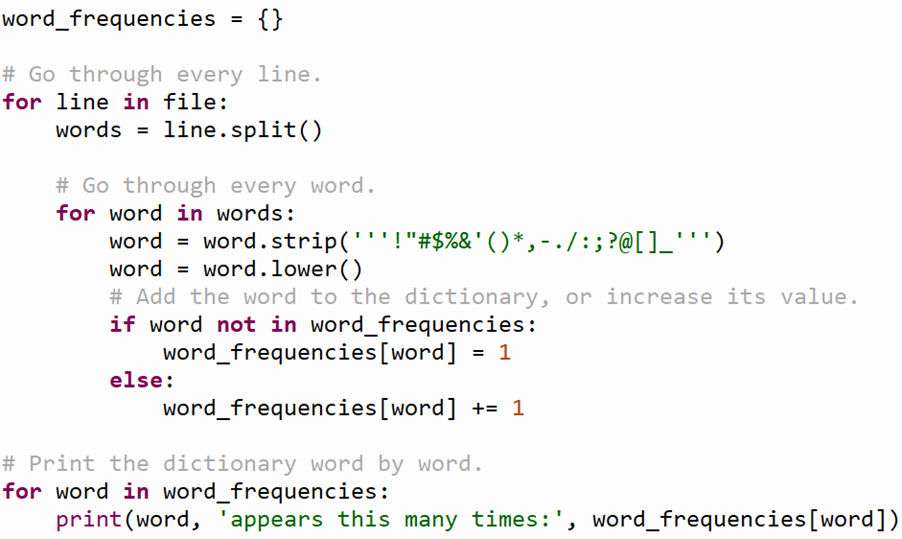
We’ve added a dictionary data structure called ‘word_frequencies’. This data structure will hold each unique word alongside the number of times it appears in the book.
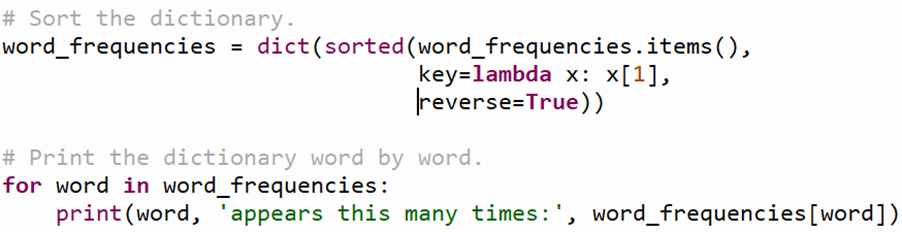
Note that the single line of code used for sorting could be considered a ‘shortcut’. It saves implementing a sorting algorithm from scratch, but it uses advanced functions and techniques that students are not expected to know at this point.
Students could instead code their own sorting function with a known algorithm, such as a Selection Sort.
Evidence of learning
You might notice that students:
- add loop control structures like FOR and WHILE appropriately
- add IF and IF-ELSE control structures appropriately, including as part of nested arrangements with other IF-ELSE structures and loop structures
- select and use the correct data structure for the purpose; for example, a list or a dictionary
- use tools in their coding environments to debug faulty code. These tools include breakpoints and stepping through code.
Common misconceptions or errors to watch for
- Using the wrong control structure blocks
- Placing control structure blocks in the wrong order, or not nesting them correctly
- Using pre-made ‘shortcut’ code without being able to explain what it does
When a student’s code does not run as expected, encourage them to talk through their code step-by-step with a class member as part of their debugging process.
Poster: Key ideas, practical examples, Australian Curriculum
Download Programming poster (years 9-10) [PDF] (opens in a new window)
Plan your teaching
Explore sample units and lessons.
These sample units show how data representation can be taught as a short sequence or extended unit at each year level.
Years 1–2: Solving simple problems
Years 3–4: Introduction to programming
Years 5–6: Programming challenges
Years 7–8: General-purpose programming
Years 9–10: Programming
Use this planning template (opens docx in a new window) to record relevant information as you view a scope and sequence topic for your year level.
Research-informed teaching
Evidence-based approaches
- PRIMM: Predict, Run, Investigate, Modify, Make
- Comprehending code (program comprehension)
- Dual coding (visual and verbal)
- Worked examples with gradually reduced scaffolding
- Culturally responsive pedagogies
PRIMM: Predict, Run, Investigate, Modify, Make
Originally researched at King’s College London, PRIMM is a coding education methodology used around the world. It addresses the problem of students merely copying existing code or being expected to start from scratch when programming.
Each phase of PRIMM provides different objectives so that students can engage more in thinking about the code they are using and producing.
What this looks like in practice
The teacher provides an existing program.
- Predict: Students examine an existing program to determine what it will do.
- Run: Students run the existing program and check their prediction.
- Investigate: Students engage in varied exercises with code, such as annotating and labelling, placing pieces in correct order, tracing and debugging.
- Modify: Students make changes to existing code to change its behaviour.
- Make: Students make a brand-new program. They may still borrow bits of code from the existing program, but the new program has a different function, context or problem to be solved.
Example
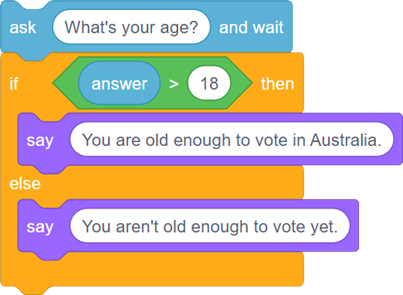
As a first go, the teacher provides this very simple program, which is visual code written in Scratch.
- Predict: Students may predict that the program will ask the user for their age, then tell them they are old enough to vote as long as they entered 18 or higher.
- Run: Upon running the program, students may realise that it has a fault. To be told they are old enough to vote, they must enter a number higher than 18.
- Investigate: The teacher instructs students to debug and fix the program, and to do a range of other activities using this or related programs.
- Modify: Students must modify the program for some other age-related threshold, or add a follow-up question only for those old enough to vote.
- Make: Students use what they’ve learned (a simple decision with a greater-than condition) in a different program they make themselves, such as a game that provides feedback on a player’s health level.
Comprehending code (program comprehension)
In recent years, program comprehension has been recognised as an important but often missed out step in learning to program. One way to provide students with program comprehension is to use a Parson’s Problem. This is a task in which students are given all of the blocks or lines of code needed to solve a problem, however, the lines have been jumbled so that they are no longer in the correct order. Students are asked to reorganise the code into the correct order to perform a specific task.
What this looks like in practice
- Share problems with only a single solution.
- Allow students to manipulate actual code blocks.
- Provide a clear description of the problem.
- Clearly show the desired logic.
- Share multiple similar problems over time.
Example
Provide students with a clear explanation of what the program should do when correctly sequenced this reduces their cognitive load. Additionally, make sure that there is a unique answer for each question, there should only be one order of the lines or code blocks that achieves the goal. For further information, refer to Program comprehension (opens external website in a new window).
Dual coding
Research synthesised by Richard E Mayer shows that students learn new concepts more effectively when information is presented using both words and visuals, reducing cognitive load and supporting deeper understanding.
What this looks like in practice
- Present new concepts using both spoken or written explanations and visual representations.
- Use diagrams, images, symbols or simple models alongside verbal descriptions.
- Explicitly link the visual elements to the language being used.
- Revisit the concept using both modes together to reinforce understanding.
Example
When introducing algorithms, a teacher explains the steps of a process while displaying a simple flowchart. As students hear terms such as sequence or decision, they see these ideas represented visually using arrows and decision shapes. Students refer to both the explanation and the diagram when describing how the algorithm works.
Worked examples with gradually reduced scaffolding
Research synthesised by the Australian Education Research Organisation shows that modelling worked examples and gradually reducing support improves learning of complex procedures.
What this looks like in practice
- Model a complete example before asking students to work independently.
- Make the thinking process explicit by explaining decisions and steps as they occur.
- Provide structured support such as prompts, templates or partially completed examples.
- Gradually remove scaffolds as students gain confidence and competence.
Example
A teacher steps through code line‑by-line with the class, showing how each decision affects what happens next. Initially, students follow a completed example. Next, they complete a partially worked program with guidance. Finally, students design and test their own programs independently, applying the same process without prompts.
Culturally responsive pedagogies
Culturally responsive pedagogies recognise and value students’ cultural identities, experiences and ways of knowing, and use these as a foundation for learning.
What this looks like in practice
- Broaden learning contexts beyond common classroom examples by drawing on culturally diverse games, stories and real‑world systems, and on texts created by authors from different cultural backgrounds.
- Select examples that reflect the different cultural backgrounds, experiences and communities represented in your classroom.
- Where possible, co-design activities with local communities or source learning materials created by First Nations authors and knowledge holders.
- Ensure cultural examples are used respectfully and purposefully to support learning.
Example
Students write programs to implement a traditional game or story shared by an Aboriginal or Torres Strait Islander author. The class focuses on identifying patterns, rules and decision points within the activity, connecting these ideas to algorithmic concepts such as sequencing and branching, while acknowledging the cultural origins and significance of the example.
Check understanding
- 3–4: Rubric
- 5–6: Work sample
- 7-8: Rubric
- 9–10: Work sample
Teachers can assess student learning in a range of ways, including through checklists, observations, rubrics and student work samples.
- Years 3-4: Designing a mini-game. The assessment section of this lesson provides advice on assessing students’ knowledge of and skills in basic visual programming.
- Years 5–6: Fashion game (opens external website in a new window). This resource includes a work sample of a digital solution with annotations about the student’s explanation of algorithms.
- Years 7–8: Rock, Paper, Scissors AI! The assessment section of this lesson provides advice on assessing students’ knowledge of algorithms and includes a rubric.
- Years 9–10: Digital project: Python game development. (opens external website in a new window) This resource includes a work sample of a digital solution with annotations about how well the student has designed and validated algorithms.
Deepen your understanding
Explore these resources to provide further background about programming:
- In-editor interactive tutorials (opens external website in a new window) (Scratch Foundation): tutorials suitable for primary students
- Courses (opens external website in a new window) (Code for Schools): Python-based coding courses
- Computing courses for teachers (opens external website in a new window) (National Centre for Computing Education): learn about implementing programming
- Secondary 4 – Conditions and functions using Python (opens external website in a new window) (coding@homeTV): a practical example of Python programming