
About this lesson
This sequence of lessons explores how to incorporate user input, decision-making and loops in programming using the context of a shopping experience, particularly the checkout. It combines data in the form of a barcode and programming choices.
Year band: 5-6
Curriculum Links AssessmentLearning hook
Introduce students to the question ‘How does a supermarket checkout work?’. Ask them to discuss what actually happens when groceries are taken to the checkout.
After their initial discussion, ask ‘What are the key parts of the system?’ Guide discussion to help them identify parts that they may have noticed. Write down key terms and parts of the system that students identify; for example, scanner, items, money, barcodes, cash register, cashier, conveyer belt, credit card reader, scales, database and central computer (data storage). Using these terms, talk about the possible interactions between parts of the system. On a whiteboard connect key parts of the system with arrows. Build up from a starting point of an item and the interactions that follow.
You may find it useful to relate discussion of barcodes to the school library and how this works. Scan a few items in the library and look for similarities between systems.
Learning map and outcomes
Explain to students that they are going to investigate the way a checkout works and design their own computer program to simulate the process. They will look at how barcodes are used to identify an item using a unique code of digits and how the information related to this item is stored, modified and retrieved.
Understandings
- A barcode is a form of data that identifies an item and relevant information that can be stored and retrieved.
- A scanner reads the barcode information.
- A checkout keeps track of amounts read via the scanner and barcodes.
- A central computer stores barcode information in a database.
- A self-checkout requires a well thought out and tested interface.
Learning input
What is a barcode?

Provide students in groups with a range of supermarket items containing barcodes or images of barcodes. (See handout one: Supermarket Barcodes.)
What do you notice about a barcode? The bars or stripes are made up of lines of different thickness and associated digits (0–9). Look for patterns between different items. Why might we have the digits as well as bars? (The digits enable humans to read the 12-digit code if the reader cannot scan the barcode or there is an error.)
Time each group to determine how long it takes them to sort the items in order using the bar code numbers. Jot down in seconds how long it takes each group. Discuss that computers can sort information extremely fast. Make the comparison to how fast a computer is able to locate an item from a list of 10,000 store items in a few milliseconds. It uses an algorithm called a binary search which halves the amount of data being searched each time until it locates the exact match. It also does a check on that barcode to ensure the code is correct – all within a few milliseconds. Compare that to how long it took to sort 5–6 items in order.
![]()
Additional scaffolding: For students who find this task/concept challenging or need more examples, you could extend this activity by creating a price list. The student would have to match the bar code to the price list and check that the item with the barcode is as described. As suggested below, you could roleplay this with a "customer" choosing items and a "cashier" who has to look up items on the price list.
Creating an algorithm
Ask students to imagine they are at the checkout with their items. What sequence of steps might a computer use to work out the cost of the items at the checkout?
Students could role-play the scanning of items and work through the process and record what they would expect to see on screen and how to progress to the next item. These questions may help students during the process:
- How could the program start?
- How would the system recognise an item?
- How do you keep a tally of cost?
- How do you know when you have recorded all your items?
- How does the program end?
Students have a go at creating an algorithm to show how a self-checkout works. Invite students to draw a flowchart by hand or using software.
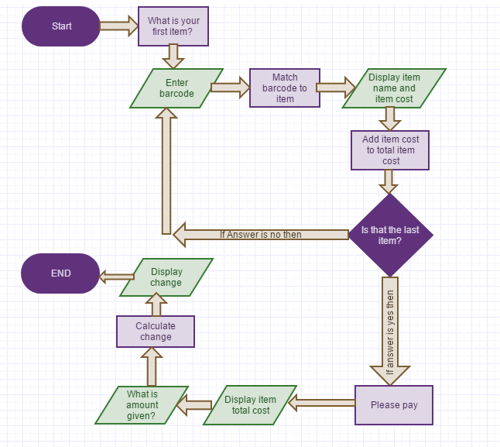
This example of a flowchart was created using Gliffy software. (Sign in for free for limited features.) Other software includes Microsoft Visio.
Alternatively, students can write their sequence of steps in what is called ‘pseudo code’.
Find out more about algorithms and pseudo code.
The following is an example of pseudo code:
Program for What is the cost of the items at the checkout?
OUTPUT - Set counter to 0. (Total item cost)

REPEAT

    OUTPUT - Ask: What is your item?

    OUTPUT - Say: Enter bar code.

    INPUT - User types in barcode.

    IF answer = barcode THEN

        Output: Display item name and item cost.

        Add item cost to ‘Total item cost’.

    OUTPUT - Are there any more items?

    IF answer =Yes THEN continue to loop.

IF answer =No  THEN.

    OUTPUT - Ask: Please pay.

    OUTPUT -  Display total item cost.

    CLEAR stored data
Learning construction
Refer to their algorithm when creating the computer program. For a programming language that uses blocks of code use Scratch, Snap, Tynker or another similar program.
Establish the mindset in which you see the importance of continually adding to and retesting the code, to look at the output onscreen and check if it works as intended. You could also set up the protocol that each person in the group programs for 5 minutes at a time.
It is expected the computer programs for this task will include the following components:
- Sequence: The program will be made up of a sequence of steps arranged in blocks of code that has a start and an end. Discuss ways to break down the computer program and start with a few blocks of code that can be sequenced and tested, then built on to achieve the desired outcome.
- Data storage: The program will most likely include variables, created in the data section, where they make a variable. This data is stored in the program and used when required. Read the article Variable for more guidance about variable blocks or view Scratch programming lessons, a tutorial on YouTube.
- Input and output: The user might be required to enter data (input) to progress. Students need to check that the data entry results in the expected output.
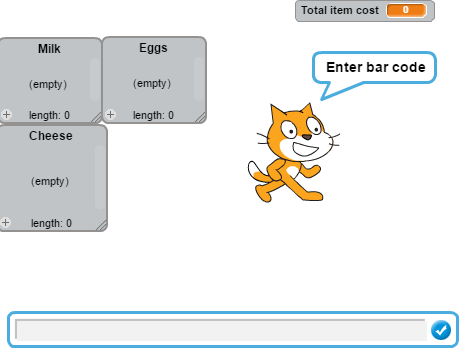
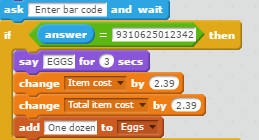
The ‘Ask’ block of code requires user input; in this case a 12-digit barcode. If that data is entered correctly, then a series of other actions occur with the output displaying onscreen.
- Branching: Certain parts of the algorithm may include if/then choices. Build these parts of the program, test and make adjustments.
- Iteration: Encourage students to build parts of the program and test it, make adjustments and look for patterns in the code where sequences of blocks are repeated. Work on that part of the sequence and once working as expected duplicate the code, making any minor changes.
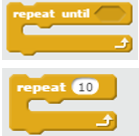
Examples of repeat blocks in Scratch.
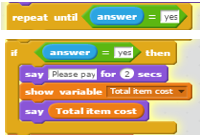
If answer is ‘yes’ then the program finalises with several actions.
Spend time with students talking about the functional requirements (outputs and calculations) of what they want their program to do. For example do users enter data or do they select from buttons on screen? Consider how the program will keep a tally of the item costs and how this is to be stored in the program.
A computer program for this task, made in Scratch, may have similar functions to Checkout, an example of a Scratch program. For students who want to add a barcode scanner, refer to this Scratch example as a guide.
Students could search for a Scratch program that features a barcode scanner and remix the project or borrow some of the code and sprites to use in their own project.
Note the examples are based around Scratch. Similar programming blocks are available in Tynker and Snap.
Learning demo
Swap programs with another
A useful approach to iron out bugs and review how well the interface works is to provide the completed program to be ‘road tested’ by someone else.
The person or group doing the ‘testing’ is observed working their way through the program, noting:
- whether any instructions are not clear
- stages where the user does not know what to do to progress
- a point at which the onscreen information is not clear
- any data that is incorrect.
The observer can take notes and then modify the program (if time permits) or list the changes they would make if they were to do things differently next time.
Learning reflection
Give each group an opportunity to share their program with the class. Students explain their choice of coding blocks and the intended onscreen output.
They compare their algorithm with the final product and talk about how some parts of the sequence may differ and why.
You may decide to talk about limitations for example:
- making it more realistic by using a scanner instead of entering data manually
- only including a small number of items instead of a database of thousands of items and their barcodes.
Resources
- Handout with supermarket items containing barcodes.
- Gliffy software.
- Review of algorithms and pseudo code.
- You Tube tutorial on Scratch programming lessons.
- Article for variable blocks guidance.
- Example of checkout on Scratch program.
- Example of checkout with barcode on Scratch program.